By Kate Swann, Florida School of Woodwork
In constructing furniture we often need to get pieces of wood to join together. While this can certainly be done with screws and glue, joinery is the more time-tested—and time-honored—method. Joinery is a fundamental technique in building casegoods and furniture, fabricating pieces of wood that interlock—the joints—and fitting them together like a puzzle.

Such joints fall into two categories: A Glue-only Joint where the wood pieces are held together just by glue. And a Mechanical + Glue Joint, which uses two techniques to hold parts together: adhesive accompanied by some type of mechanical locking mechanism. A dovetail as a great example of this type of joint. Now let’s take a look at one of the most useful joints – the mortise and tenon joint.
What’s a ‘Housed Joint?’
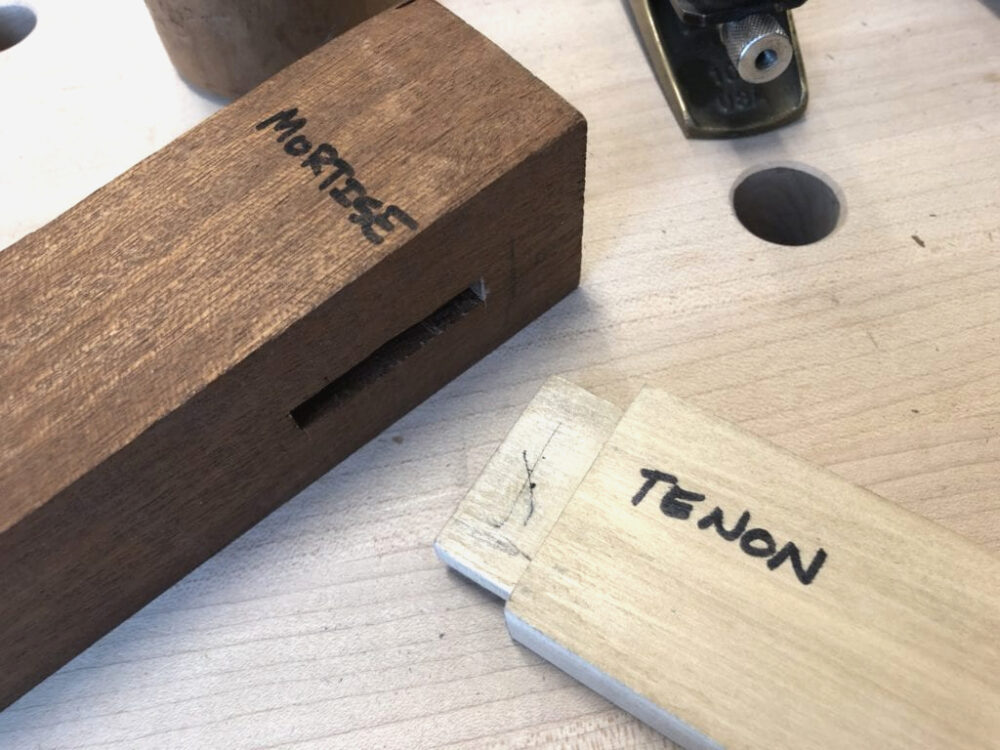
A mortise and tenon joint falls into the category of known as “housed joints”—where one piece slots or fits into another. Think of the mortise and the tenon as putting a “square peg in a square hole.”
Mortise and tenon can be used to help reduce racking and twisting in a project and will make your piece of furniture last for years. As with most joints, there are variations, but all of them rely on the long-grain glue surface area for their glue strength, the fit of the side of the tenon—known as the “cheeks”—for snugness and the depth of mortise for strength.

Laying Out a Tenon for a Mortise & Tenon Joint
Master woodworkers follow two general guidelines when planning for tenons (though they cut the mortise first). Not following them may interfere with the structural soundness of the joint.
- Length of cheek should not be more than the width of the wood
- Width of the cheek should not be more than half the thickness of the wood—preferably a third.
- Regardless of how you cut your mortise and tenons, clean layout is the key to accuracy.
About the Mortise
The design of the mortise, the cavity into which the tenon is placed, is governed by functionality and performance. Generally speaking, the width of the mortise should be one-third of the thickness of the stock, but you do have some latitude. If you are going to use a router to cut your mortises, you’ll need to find out what router bit you have that is the closest to that thickness.

Woodworkers know not to make the mortise to too wide as then the cheeks will be weak, nor should they be too narrow, as it will make the tenons weak. One-third is just about right. In handwork, mortises are laid out and cut first, and the tenons cut afterward.

A mortise can be cut using a plunge router, fixed table router, or with a sharp chisel and mallet. A mortise can also be cut using a drill press, using either a regular drill bit and then chiseling out the cheeks, or using a mortising drill bit (although these tend to dull fast and get clogged easily). Knowledgeable woodworkers will advise you to invest in a good quality bit; look for carbide blades from a reputable manufacturer.

Types of Tenons
There are lots of different kinds of tenons, but two of the most common are:
Blind or stub tenon—which stop inside of the receiving part and cannot be seen
Through tenon—where they go all the way through to the other side and sometimes protrude beyond the surface—seen often in Arts and Crafts furniture.
How To Cut Tenons
You can cut tenons with a wide variety of tools such as the table saw, bandsaw, handsaw or chisels, but the most critical aspect is that they are cut accurately. Just like mortises, they should be laid out on the wood surface before cutting.


Mortise and tenon joints are very versatile. You can use them to join the legs on chairs. You can use them to make a door, or create case pieces.
About the author: Renowned for her exquisite textural and surface embellishment work, Kate Swann is a master craftswoman of fine wood furniture and sculptural works. Her unique artwork has received much praise and many of her designs are recognized as signature works: published, collected and widely known. She is the founder of the Florida School of Woodwork.


